My favorite part of building frames and forks is getting to see the finished products in use. Sometimes I get to see my work rolling down the road next to me, but more often I just get to see photos. I’ve been receiving photos from distant customers of their installed Frame-Neutral Replacement Forks, so I thought that I would share a few.
These customers share a common story. They all had nicely built, good fitting bikes, outfitted with carefully selected components. They all had tried carrying small-to-moderate loads in a front bag, and were unhappy with the resulting handling of the high-trail steering geometry. Each wanted to obtain a low-trail replacement fork, either as a long term fix, or as an experiment prior to committing to a full new frameset.Randy rides his Rambouillet (shown below) on all surfaces with 700Cx30 tires. The FNRF was designed with a 62mm offset, yielding about 40mm of trail. This fork has lighting wire guides up the right blade, and separate under-crown mounting points for the fender and the VO randonneur front rack. Matching the original orange pearl paint finish would have been a bit pricey, so this fork was painted in the cream color used for Rivendell’s contrasting head tubes. As the lovely young Maia shows us, the installation was completed with a big front bag, and a nice centerpull brake to handle the new 67mm reach. Bill recently bought the new Surly Traveler (below), which is the well known Cross Check frame with S&S couplers. He also owns a Kogswell P/R with a 40mm trail fork. While he generally liked the Surly, he found that he really preferred the way that the P/R handled with a front load. Bill decided to modify the Surly with a FNRF with 68mm of offset, which yields about 41mm of trail with his favorite 700Cx33 tires. He also requested an under-crown fender mount, and special through-hole bosses on the fork blades for the Tubus Duo lowrider rack. Bill selected a color from the DuPont paint chip book, and reports a “very close to perfect” color match. The fork carries a Nitto M12 front rack, and Jitensha medium bag.
 Orin also rides a Rambouillet, as a randonneur and urban commuter, and wants to carry things in a front bag. His FNRF (shown below) was built with 62mm of offset, yielding about 40mm of trail. He also requested a full set of rack/fender mounts, generator hub up-and-over wire guides, a dedicated light boss low on the left blade, and a switch to a threadless steerer. With the photo, he noted that this light wire previously had been wound tightly around a support, and needs to relax to look neater in the fork’s guides. Although the fork was built to use the VO randonneur front rack, Orin later decided to design and fabricate his own stainless steel rack. This bike already was using a front Tektro R556 long reach (55-73mm) caliper brake, which was able to handle the longer reach on the new fork.
 Several years ago, Shimano’s introduction of a dual-pivot standard reach (47-57mm) brake was well received as a tidy solution for wide(er) tires and lots of clearance. In practice, however, there were some small, but nagging, deficiencies. The quick release didn’t pass tires wider than about 28mm, and the maximum usable brake reach was really about 55mm.
Now comes the Tektro R538 caliper (above), which is a near-perfect implementation of this brake format. The novel long-throw quick release design is wonderful. When adjusted to work with a 19mm wide Mavic Open Pro rim, this release opens up the pads to a generous 33mm of wheel removal clearance. Wider rims yield an even wider opening. This makes a world of difference for users of Shimano brake levers. Couple the R538 caliper with a Campy-style release in the brake levers, and you’ll have clearance to remove any tire that you’d reasonably run underneath this brake.
As a frame builder, I’m excited about the fact that the R538 actually reaches to a full 57mm. I know this may sound a bit silly, but those extra 2mm are meaningful. On a carefully handcrafted frameset intended for standard-reach calipers, I’ll design to use every last millimeter of functional brake reach, and let the owner benefit from the maximum clearance. The photo above shows the R538 over a 700C x 32 Pasela.
I’ve used the Tektro R538 calipers on three bikes recently, and I find that the orbital washers behind the cartridge-style shoes make pad alignment a cinch. The brake’s high quality, graceful styling and lustrous finish compliment a beautiful frame. It’s now my "standard" for standard-reach calipers.
The frame pictured with the brake is Maggie’s new low-trail All-Rounder, built mostly with light weight Dedacciai Zero tubing. The lugs are Nuovo Richie, which are cast with the styling seen below. Once again, color was personal and important, and Maggie selected a gorgeous Medium Iris pearl.

It was quite a winter, with a record-setting snowfall, but the “good” bikes with beautiful paint are out on salt-free roads again, competing with the early flowers for a place on the color palette. Soon to be among the brightest is Leslie’s new All-Rounder. From the start, Leslie was sure about wanting a yellow bike. As usual, there were lots of yellows to choose from, and the selection turned into a group effort as the chip charts appeared at skiers’ social gatherings. In the end, we nudged Leslie towards a finish composed of House of Kolor "Lime Gold Kandy" over a "Lemon Yellow" base, then crossed our fingers that it would look as good as that tiny little chip did. Wow, does it ever! In yet another masterful job by painter Keith Anderson, this finish is stunning. In the sunshine, the candy coat’s gold effect explodes atop the screaming-bright lemon yellow. In the shadows, your eye picks up the faintest hint of the candy coat’s subtle lime hue, but your brain still says “yellow bike”.
 This frame needed a generous stand-over clearance, and had to accommodate getting the bars up there with a classic quill stem. I also prefer a minimum head tube length of 120mm with lugged construction. All of this was accomplished easily by designing a 6.3 degree upslope on the top tube, and using the new Mini 6 lugset, which was developed by Darrell McCulloch for just this sort of configuration. The lugs were carved a bit to achieve the style that I wanted for this frame.
 Designed primarily for all-surface recreational riding, but with capabilities for light touring, this frame is built from a medium-weight selection of Dedacciai and True Temper tubing. Shown here with 700C x 28 tires, but the standard (57mm) reach calipers will accommodate 32mm tires with fenders, or 35-38mm tires without fenders.
And, being custom, Leslie got her wish for a kickstand mounting plate. This is becoming a trend.
What happens if receive your Frame-Neutral Replacement Fork™ and really like it? This is the story of a customer who recycled his low-trail fork into a new bike designed around that geometry.
 I originally built a low-trail replacement fork for Jay’s Rivendell Canti-Romulus, designed with a 60mm offset that produced about 44mm of trail. Soon after receiving this new fork, Jay telephoned to say that he wanted to commission a new frame, incorporating this fork, if possible. He had some fit issues which could be addressed with a made-to-measure frame. He also had a wish list of small details, including a kickstand plate, which would be easy enough to get just right on a custom frame.
No problem. Every frame that I design begins with the fork. There certainly wasn’t anything to prevent Jay’s fork from being recycled, as long as it passed my inspection for damage or misuse.
Jay planned to strip the components from his Romulus to use on this new frame, which would be built with cantilever bosses. Before those rear cantilever bosses had been brazed into place, he sent an e-mail saying that he’d unexpectedly sold the Romulus complete, and would be buying all new components. I pointed out that brake technology now was an open option, and asked if he might like to consider using extra long reach (55-73mm) dual-pivot sidepull caliper brakes. Jay already was familiar with the beautiful “Silver” model from Rivendell, and jumped at the chance to use brakes which would match so nicely with the style of bicycle he envisioned.But wait … doesn’t the fork have cantilever bosses? It sure did, but those were removed with some very careful hand work with files and sandpaper. No additional heating on the fork blades, and no trace that the canti bosses ever were there. Spoiling the fork’s paint wasn’t a concern since the new frameset was going to be painted in a different color.
So there it is, a second life for a Frame-Neutral Replacement Fork™ and a happy customer with a new bicycle designed to fulfill a dream. That, I propose, is why I do this.
And, finally, a few details, starting with that mounting plate for a fancy Pletscher kickstand.


This fork started out as a low-trail Frame-Neutral Replacement Fork™ for a Rivendell Rambouillet. As we discussed the customer’s current setup and future plans, the fork’s specification expanded to include some neat custom features.
The customer requested separate under-crown mounting points for both a fender and the new Velo Orange randonneur front rack. This rack, intended to be used with caliper brakes, features a center tang made from a flat strip which attaches underneath the crown. With the limited space available in the open end of the steerer tube, this called for a carefully designed piece to provide two threaded sockets with enough separation to be functional, enough depth-of-thread for a solid connection, and no interference with the brake’s center bolt.
 The mounting solution shown above provides a 6mm socket (front) for the rack, and a 5mm socket (rear) for attaching the fender. The spacing between the sockets is maximized, and the socket depth provides 5mm of full contact thread. The bridge that carries the sockets is about 2mm thick, and, with this crown, provides the extra bit of vertical drop required to allow the rack’s tang to pass cleanly beneath the arch of a Tektro R556 caliper brake. With the additional fork length built in to compensate for the added fork offset, all of this stuff underneath the crown won’t interfere with the clearance needed to properly position the fender over a 700Cx30 Grand Bois tire.
The customer will use a generator hub, running the light wire all of the way up the right fork arm, then down the left arm to a low-mounted light. To eliminate that whole unsightly zip-tie and p-clamp scene, this fork received a full set of brazed-on lighting wire guides, along with a dedicated light mount low on the left arm.
Small details like these really clean up the appearance of a bicycle. In doing so, the details themselves tend to disappear from the casual observer. But they’ll always be there, providing a perfect foundation upon which to carry your load, keep you dry and light your way.
That's what she liked the best, the Meteor Maroon Pearl that she had selected after spending a few weeks with the House of Kolor chip charts. Nice, but not a color that really jumped out and grabbed me like others do. But that was when the forest still was green.
By the time that this Low-Trail All-Rounder frame returned from the painter, the light here in northern New Hampshire had undergone the seasonal shift from green to golden. When I carried the frame outside to view it in natural light, I was stunned by how elegant the color appeared in the Fall colors.


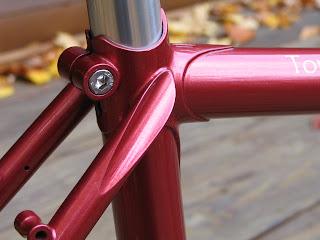 Standing there, staring at that lustrous Maroon, I was conflicted …. Should I build it up as promised for the next day’s inaugural ride, or should I just keep it as a centerpiece for the Thanksgiving table? Better judgement always seems to prevail, and I realized that our dining table isn’t large enough to hold both frame and food. What a shame.
 The next morning dawned clear and cold, and Jackie arrived early for the first ride on her new dream bike. We picked a route to exercise this bike's great versatility, starting with mixed-surface backroads, then later heading for Crawford Notch as the day warmed. Watching her spinning along in the Fall colors made me realize that Meteor Maroon is one of those colors which looks so much better in real life.
Within bike-tech circles, there has been a growing realization that carbon fiber forks aren’t up to snuff. No, I’m not talking about the “squirrel got caught in the spokes and shattered my fork” stories. I’m referring to the unhappy discovery that many mass market carbon forks – including major brand names – are poorly aligned. So poorly, in fact, that it can have a serious negative impact on a bike’s overall handling. This quality control problem in the manufacture of carbon forks is summarized in a recent article from Calfee Design, a highly regarded builder of carbon fiber frames.
So, why does this concern someone like me, who builds and uses only steel forks? It provides a perfect counterpoint for telling you a little about my approach to building – and aligning – custom steel forks.
Building an aligned fork is more difficult than building an aligned frame. On a fork, there are seven independent dimension and location variables, which must be satisfied simultaneously, in three dimensions. My work process for building a steel fork is based on subassemblies, similar to my approach to building a frame. The crown is brazed to the steerer, and the crown race seat is machined to specification on a lathe. The dropouts are brazed into the raked fork blades. The fork’s alignment variables all come together when these subassemblies meet in the fork jig, where I cut the fork blades to a precise final length, and pin the blades into the crown sockets. The securely pinned fork is removed from the jig and free-brazed in a specially designed rotating fixture, producing a finished fork which is free of residual stresses and very close to its final alignment standard. Any brazed steel fork will benefit from a final alignment, simply to remove the small displacements which are a consequence of the heating cycle. This is an area where my clock-be-damned approach to framebuilding allows me to be exceptionally picky. Like most builders, I align off of a granite surface plate, using machinist’s v-blocks and gauges. But, by the time that all of the fork alignment tools are out – including custom tooling that I’ve created just for this task - I feel a little like the crazed dentist that Steve Martin played in that movie.
The Calfee article notes that “A diligent steel frame builder can align the fork blades to within a millimeter of symmetry. Certain well known builders align them to within 0.5 mm.“
I routinely confirm the alignment of my forks to within 0.5mm of specification, on each measured variable. Apparently, I devote more attention to fork alignment than many other builders. That’s OK by me. As I see it, your fork is too important for anything but the best in craftsmanship.
 Bill recently bought the new Surly Traveler (below), which is the well known Cross Check frame with S&S couplers. He also owns a Kogswell P/R with a 40mm trail fork. While he generally liked the Surly, he found that he really preferred the way that the P/R handled with a front load. Bill decided to modify the Surly with a FNRF with 68mm of offset, which yields about 41mm of trail with his favorite 700Cx33 tires. He also requested an under-crown fender mount, and special through-hole bosses on the fork blades for the Tubus Duo lowrider rack. Bill selected a color from the DuPont paint chip book, and reports a “very close to perfect” color match. The fork carries a Nitto M12 front rack, and Jitensha medium bag.
 Orin also rides a Rambouillet, as a randonneur and urban commuter, and wants to carry things in a front bag. His FNRF (shown below) was built with 62mm of offset, yielding about 40mm of trail. He also requested a full set of rack/fender mounts, generator hub up-and-over wire guides, a dedicated light boss low on the left blade, and a switch to a threadless steerer. With the photo, he noted that this light wire previously had been wound tightly around a support, and needs to relax to look neater in the fork’s guides. Although the fork was built to use the VO randonneur front rack, Orin later decided to design and fabricate his own stainless steel rack. This bike already was using a front Tektro R556 long reach (55-73mm) caliper brake, which was able to handle the longer reach on the new fork.


