Friday, October 22, 2010

Silver Bullet

Just the basics ... no racks, no fenders, no lights. And a customer who was clear about this being a tool, not a piece of art, so no fancy lugs. Not exactly my normal type of project, but there were fit issues to make things interesting.

John is a strong, 40-something rider trying to balance family, career, and a love for racing on a bike. In our first telephone conversation, he described his body type as "hockey player", like many of his fellow Canadians. And then he mentioned his short legs.

With my encouragement, John went in for a session with a local fitter, had his current bike adjusted by a bit, and rode enough to conclude that he liked the new arrangement. Using that model for the rider's contact point dimensions, I designed the frame shown above.

The 49.5cm (c-t) seat tube provides the amount of standover clearance which John requested, and the 6 degree upslope on the top tube places the top of the head tube up high enough to keep the stem spacer stack reasonable. The longer stem works with a good amount of saddle setback to balance the rider over a 98.3cm wheelbase, creating this agile little racing machine. The frame was built with the Columbus Spirit for Lugs tubeset, which is manufactured with the longer butted ends that are essential for fabaricating such a small frame. The styling is kept simple with the Llewellyn Mini-6 lug set and the new Pacenti Mitsugi fork crown.

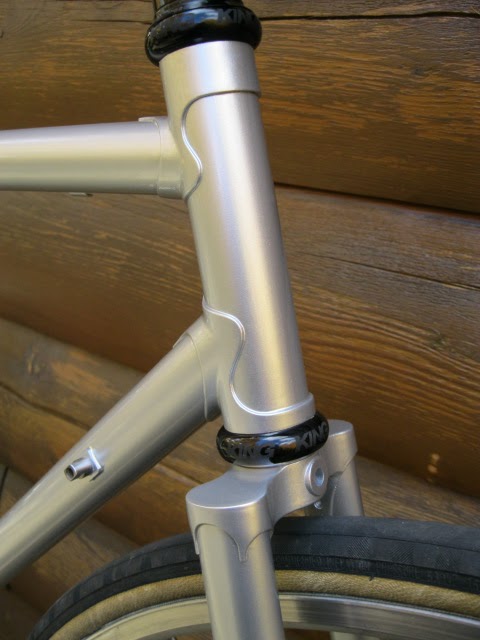
The paint is a high "sparkle" content metallic silver, which is very reflective. With this base, the clearcoat tends to pick up and emit a faint hint of nearby bright colors, which is a pretty cool effect.

Update ..... John sent this photo of the bike, built up old-school style with toe clip pedals, DT friction shifters operating a 2x7 drive train, and a
Modolo master pro brakeset. Quality parts throughout, including the Campy Ti seatpost and the beautiful leather Berthoud Ti race saddle. Nice job, John!


Friday, August 20, 2010

Dressed For Work

As promised, here is Randy's new All Road, completely outfitted for long rides down any road, in any weather and any light. These are a few selected photos from a larger gallery.

Along with the frameset, I also built a custom front rack and decaleur, as shown below. The rack attaches to the brake bosses used by the vintage centerpull brake, using special double-ended bolts. Hidden wire guides continue the course started on the fork blade, and the special mount neatly tucks the B&M LED headlight underneath that big Ostrich bag. In the head-on view, you can see the fixed portion of the decaleur which remains attached to the stem when the bag is removed.


And finally, a bit of rear brake and fender detail. But really, I can't take my eyes off of that stylin' tail light, sitting proud on its dedicated mounting boss.

Wednesday, August 18, 2010

Racks and Decaleurs

A recent flurry of rack-building activity resulted is a nice sampling of various approaches to attaching a small rack to a fork, and stabilizing the bags that go with such racks. There's a stream of six photos showing these recent racks and decaleurs that starts here.

Probably the most interesting, from a fabricator's perspective, is the rack shown below. The customer came to me with an expensive new custom (built by a well known Wisconsin outfit) that was intended to combine the center-mount brake with a rack that attaches via one of those "you-bend-it-to-fit-under-the-brake" center tangs. The execution had been muffed, the spec'd rack sat where the fender should be, and his fork simply didn't accommodate the tire and fender that he'd listed on the order form. One part of my solution was to build a rack that features a yoke that mounts on the brake's center bolt, sandwiched between the brake and the front of the fork crown. This took some doing to fly the rack's deck tubes around the brake's working envelope, away from the crown's protruding shoulders, and into the yoke. But it turned out very nice. And, although this was designed around the Tektro R538 sidepull brake, we also know that it works equally well with the new Paul's Racer-M center-mount.

When it comes to stabilizing the bag on these front racks, I believe that there's a valid structural design argument for not using an overly tall backstop supporting an integrated decaleur fixture. Instead, I prefer a design with the decaleur's root placed high and forward, and with short lever arms that carry bag-generated bending forces. The decaleur shown below mounts to a stem with a 4-bolt faceplate, and incorporates my design preferences. With a modular design like this, individual elements can be replaced to fit other bag/stem/rack combinations.

The photo below shows this decaleur design in use. The spine piece is bolted directly to the bag. The linkage is created by inserting the L-shaped retaining pin, which, in turn, is locked in place by the little R-clip. To release the bag, simply remove the R-clip and slide out the retaining pin.
With this particular frame/stem/bag combination, the bag support hangs from the stem on short struts, rather than by the long cantilever arm found on aftermarket steerer-mounted decaleurs. And these struts are easily positioned using bolts, not by bending the structure. My design may weigh a bit more than something integral to the rack, but, as one customer described it, it's "sturdy as all get out". That's the idea, no?

Wednesday, July 28, 2010

A Green All-Road for the Green Mountains

After riding a succesion of modern production steel frames which he felt were "overbuilt", Randy decided to have a custom frameset built to suit his stature and riding style. The stature factor called for a large (62cm c-t) frame with enough flex to work in harmony with a fairly light, but strong, rider. The riding style factor called for a bike tough enough for bombing the dirt roads in Vermont's Green Mountains. He's also a part of the low-trail/fat-tire crowd, and this new bike would be built around that type of geometry. The result is the All-Road frameset shown above.

For the frame's main triangle, I used a selection of modern Dedacciai tubes in "standard" diameters, which mimic the flex of the old classic Reynolds 531C tubeset. The oval chainstays provide ample clearance for the 700C x 35 tires, and the lighter-gauge seatstays provide a bit of additional compliance.

The fork is where the beef is. I used the new Grand Bois cast crown, which is designed for Imperial oval fork blades. On the classic Imperial oval profile, the top of the blade has a longer fore-aft dimension than does the succesor Continental oval, which tends to push blade flex farther down toward the tip of the blade. Since Randy likes to ride fast on pot-holed dirt roads, I wanted to use fork blades that are stronger than what I'd normally use for a rando frame. Many thanks to Richard Sachs for providing the NOS Reynolds 531ST fork blades from his personal stash. The photo below shows the Grand Bois crown, along with the custom-made brazeon mounts for the DiaCompe 700 centerpull brakes.

Randy wanted a clean, classic look, and selected this nice set of long point lugs. The Paragon rear dropouts, which are CNC'd 4130 CrMo steel, compliment this look and are uber-tough. The frameset incorporates a full wishlist of fender mounts, rack mounts, light mounts & wire guides, extra bottle cage bosses, and chain catcher. The fender mount bosses are positioned for a generous 13mm of clearance between 50mm fenders and the spec'd 35mm tires. The frameset was designed around a Miche threadless needle-bearing headset, which also compliments the styling by being logo-free.

There's also a custom front rack and decaleur on the way. I'll put up another post later showning this bike fully dressed.


Sunday, July 25, 2010

Making a (Under) Statement

Branding. That word used to describe what ranchers did to identify their cattle. These days, the word has been adopted by the marketing guys to describe an intense competition to get their company name in front of the consuming public. Bicycle manufacturers, with a long tradition of including names and logos on frames, have embraced this new branding ethic in a big way. Walk around most modern bikes and you'll be able to read the company name from almost any angle. Does a bike frame really need to have 8 to 10 decals that all display the same word?

My own sense of style says that the frame's metalwork and paint should define the look, and that look should be an understated elegance. I have no desire (or need) to plaster my advertising on
your bike.

All creative works, bicycle frames included, deserve to be signed by the artist. To that end, my frames carry a single, small copy of my builder's "signature" on the top tube. In the full-frame photos on this site, you'll have to look hard to spot this small graphic.

My frames are painted by Keith Anderson, whom I consider to be a valued partner in this enterprise. Keith places his own artist's signature in an out of the way location on the left chainstay.

From the beginning, I have adhered to this understated styling, not worrying if it might turn off potential customers. Recently, to my delight, I am being contacted by customers specifically because of this styling. They've never met me, and likely don't know anybody who owns one of my frames, but they've been searching for a builder who will hold off on the decals. Through the power of the internet, they've found one!

Sunday, May 23, 2010

Brakes: Act 2

When you find a truly great component, you want to keep using it forever. Sometimes, however, that requires a little creativity.

When Randy and I started discussing what he wanted in a new frameset, he was definite about wanting to modify a rare set of DiaCompe 700 centerpull brakes to mount via braze-on bosses. The photo below shows this brake model as it was originally produced, with the beautifully designed caliper arms mounted using a universal-fit yoke and center bolt.

In contrast to Mafac centerpulls which are readily convertable to braze-on bosses, the center-mount DiaCompe 700 uses a spring shape which doesn't allow the original spring to anchor to the boss as it should. In addition, the dimensions of the DiaCompe's pivot are sufficiently different from current brake standards that this brake doesn't mate with stock bosses. The solution was to fabricate a set of hand-wound stainless steel springs. After several prototypes, I arrived at the spring profile shown in the photo below.

This photo also shows the custom braze-on bosses that I made for this project. The dimensions on these bosses are optimized to mate with the DiaCompe 700 brakes' original pivot bushings. And, since bosses and springs were designed in concert, the single spring anchor hole is all that's needed.

The photo below shows the DiaCompe 700 brake arms mounted to the braze-on bosses. Those are 50mm fenders mounted with 13mm of clearance over 35mm Pasela tires. These brakes are both beautiful and well designed, and I'm happy to give them a second life on this new All-Road frameset that I know Randy is going to ride hard.

Update ... After updating these brakes with modern Kool Stop pads, pulley-style hangers and shorter straddle cables, Randy reports "I've never ridden with brakes that stop so well and modulate so nicely. All that work was well worth it."